Use a Groovy script to create target instances.
Category: Groovy
Parameter:
Using the Groovy Create function you can control the creation of individual target instance independent of a source schema through a Groovy script. This can be combined with using regular mapping functions to assign or generate values for the target properties.
The Groovy script is called for each target instance to create. The
_index
variable provides the index of the current instance to be created, starting with
zero.
There is a dedicated API to create the target instance -
it is explained in detail below. In addition, basic knowledge of the
Groovy programming language is recommended.
To create an instance as result of the script, you have to use the
so-called builder API. You have to define a closure that describes
how the instance is structured, which properties should have which
values and so on, and add it using the
_target
variable.
The most simple of structures - an empty instance -
can be created like this:
_target {

}
The builder by default creates the instance based on the structure defined in the schema. Thus using properties that do not exist in the type definition will fail. To get into more detail on how the builder API works, let's assume the following structure as the schema of our target instance to be created:
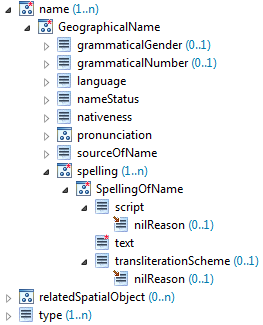
The structure is quite complex, but let's start with something simple: There is a type property which can have a string value - we can add a type property with the value test to our instance like this:
_target {
  type('test')
}
The type property may occur multiple times, we can easily add the property more than once:
_target {
  type 'test1'
  type 'test2'
  type 'test3'
}
This creates three type properties in the instance, each with a different value. As an alternative to before, here we use a notation without brackets.
The builder calls can be mixed with programming constructs, for instance could we achieve the same as above using a simple loop:
_target {
  for (i in 1..3) {
    type('test' + i)
  }
}The type structure also contains a complex name property with several sub-properties on multiple levels. Such a nested structure can for example be created like this:
_target {
  name {
    GeographicalName {
      language 'en'
      spelling {
        SpellingOfName {
          text 'some name'
        }
      }
    }
  }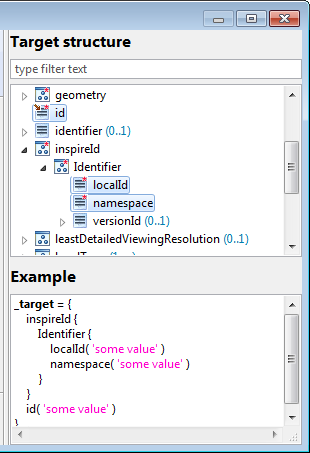
}The script editing page offers the possibility to open a tray showing the target instance structure. You can use it to browse the properties and sub-properties. If you select an element, sample code for creating an instance with that property is shown in the text field below. Select all the properties you want to populate to generate a template for the instance creation. To use it just copy the sample code to the editor.
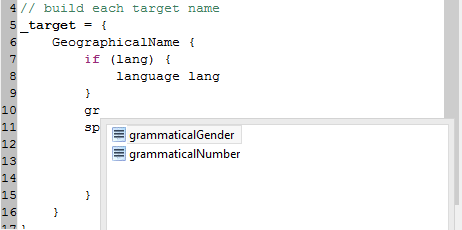
In addition there is support for content assistance when building an
instance, it can be triggered with
Ctrl+Space
in the Groovy editor. It allows selecting applicable properties to
build at the current position from a list.
In case there are multiple properties with the same name you have to reference a specific property explicitly by specifying its namespace. This is done through a named parameter namespace like in the example below:
_target {
  type('test', namespace: 'http://my.namespace.com')
}
Another problem that may arise is that property names may be
conflicting with variables, reserved keywords or other identifiers.
You can solve this by explicitly calling the builder, which is
available as the variable
_b
in the script:
def type = 'test'
_target {
  _b.type type
}
If you need to use a property name that is a reserved keyword in Groovy, e.g. class, then you need to quote it. For example:
_target {
  'class'('test')
}You can create multiple result instances by simply calling _target multiple times. For each call a result instance is created, and you can even integrate this with programming logic like loops. For example:
for (num in 1..3) {
  _target {
    id ( "Feature_$num" )
  }
}If you want to skip creating a result instance for certain reasons, you can do so by simply not calling _target in that case.
Alternatively you can also throw a NoResultException, for example:
if (condition) {
  throw new NoResultException('reason')
}

_target {
  ...
}hale studio provides the possibility to extend it with helper functions that can be conveniently called from Groovy scripts. An overview on the available functions can be found in the functions tray (see below). Select an individual function to get detailed information on:
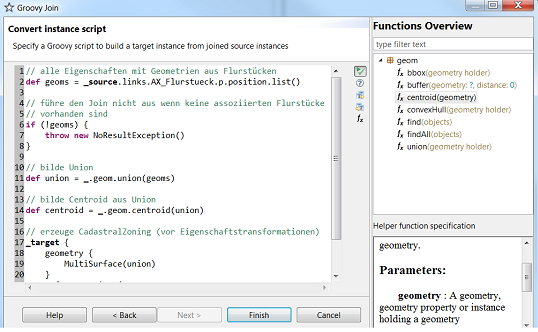
The functions are accessible through the
_
binding in the script, and are organized in categories/packages.
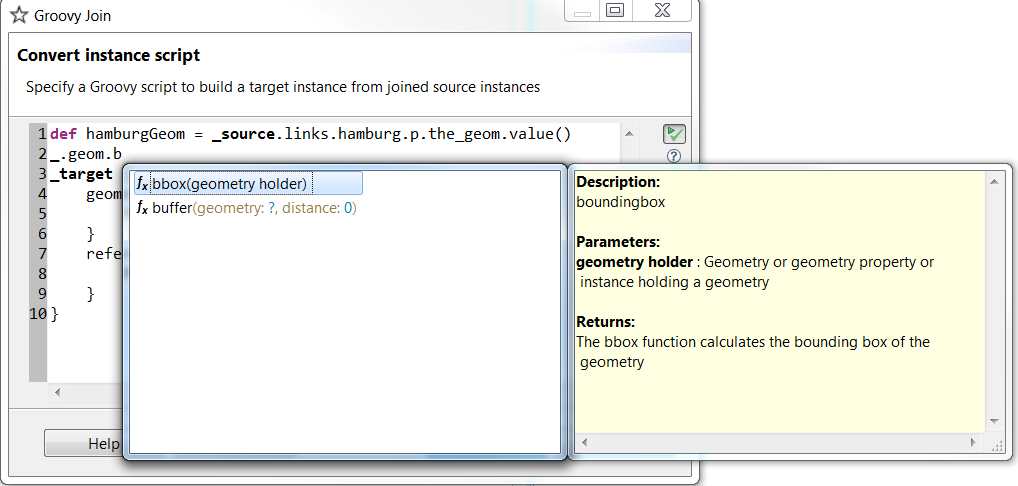
Generally, if a function supports multiple parameters, you have to use the named parameters notation of Groovy. For Example:
_.geom.buffer(geometry: g, distance: 10)
Above the function
buffer
in the package
geom
is called with two parameters, the variable g as the geometry
and 10 as the distance.
There is auto-completion available for helper functions as well.
Auto-completion can be triggered with Ctrl + Space. Make sure
to start with
_.
, you may have to specify a start character to have a valid script
for the completion processor to work.
Now we know already that the binding allows accessing
_target, _b and, depending on
which Groovy function you are using either _index,
_source or the source properties. But there are
further variables you can access.
_sourceTypes (not available in GroovyCreate) contain the
source types in the case of a type function and in the case of a
property function the source types of the type function in
which this property function is executed in. It is a List of
eu.esdihumboldt.hale.common.align.model.impl.TypeEntityDefinition.
_targetType contains the
target type in the case of a type function and in the case of a
property function the target type of the type function in
which this property function is executed in. It is a
eu.esdihumboldt.hale.common.align.model.impl.TypeEntityDefinition.
_cell contains the cell of this function. It is a
eu.esdihumboldt.hale.common.align.model.Cell
_log enables the script to log infos/warnings/errors
during execution. Each method accepts a string and (optionally) a throwable.
Examples:
_log.info("Executing function!")
if (badCondition)
  _log.warn("Bad condition occured!")
try {
  executeSomething()
} catch (SomeException e) {
  _log.error("Exception occured!", e)
}
_project
provides access to project information and variables. The following
information is available:
_project.name_project.author_project.description
_project.vars.NAME
gets the value of the project variable with the name NAME
and reports a warning if the variable does not exist.
_project.vars['NAME']
gets the value of the project variable with the name NAME
and reports a warning if the variable does not exist.
_project.vars.get('NAME', 'default')
gets the value of the project variable with the name NAME
if it exists, otherwise yields the default value provided as second argument.
_project.vars.getOrFail('NAME')
gets the value of the project variable with the name NAME
if it exists, otherwise fails with an exception.
Using
_snippets
you can access Groovy snippets that were imported into the project.
This allows you to keep extensive logic in external files, and
allows to easily reuse them across different transformation
scripts.
You can reference a specific Groovy snippet by its identifier that you set when importing the snippet. A list of all snippets and their identifiers is available in the Project view which also allows removing imported snippets.
A snippet has the same binding available as the transformation script you include it in. You can pass additional variables to the script that will be added to the binding.
For calling a snippet there are two recommended ways:
In both cases usually the return value of the snippet or
closure will be used in the transformation script.
Here are some examples calling a snippet with the identifier util:
// run the snippet
def res1 = _snippets.util()
// run the snippet passing binding variables
def res2 = _snippets.util(limit: 10, verbose: true)
// run a closure
// assuming the snippet defines the method "format"
def res3 = _snippets.util {
  format(source_field)
}
There are some restrictions associated with the use of snippets:
Tip: In case you are using the snippet script also in other contexts than hale, you can detect within the script if it is run in hale with the following check:
if (binding.hasVariable('runs_in_hale')) {
  // only do this when run in hale
  ...
}
withCellContext provides access to a map unique to each
cell. For synchronization you should only access the map inside the
closure like shown in this example:
withCellContext {
  def count = it.count
  if (count == null)
    count = 0
  it.count = ++count
  _log.info("count is " + it.count)
}
withFunctionContext provides access to a map unique to
each function (all cells of this function). For synchronization you
should only access the map inside the closure like shown in this example:
withFunctionContext {
  def count = it.count
  if (count == null)
    count = 0
  it.count = ++count
  _log.info("count is " + it.count)
}
withTransformationContext provides access to a map
unique to the whole transformation. For synchronization you should
only access the map inside the closure like shown in this example:
withTransformationContext {
  def count = it.count
  if (count == null)
    count = 0
  it.count = ++count
  _log.info("count is " + it.count)
}
Note: When using one of the transformation contexts that allow you to share data between script executions in different places, keep in mind that usually no order in which instances are transformed can be guaranteed. The only way to influence transformation order is setting cell priorities on type relations.
A collector is a helper object that allows you to easily collect information.
To create a new collector instantiate one like this:
def c = new Collector()A collector often is useful for collecting (shared) information in a transformation run. Thus a helper method is provided as part of the helper functions, that retrieves or creates a collector associated to a context map. For example:
withTransformationContext {
  def c = _.context.collector(it)
}In a collector, information is stored based on keys. Most often a key is a string, but you can also use other objects as keys.
The following statement adds a value to the key named
identifiers
:
c.identifiers << 'ID1'Keys can be used with an arbitrary number of levels:
c.hydro.rivers.identifiers << 'ID1'Non-string keys (for example numbers or lists) or variables can be used as keys by using the squared brackets notation:
def key = ['foo', 12]
c[key] << 'bar'
c.hydro.rivers.source[12] << 'ID1'
When you know that you deal with a single value instead of accumulating values, you can use the assign operator:
def key = 'identifier'
c[key] = 'ID1'
There is no need to create keys, the corresponding child collectors are created automatically when a key is accessed.
To retrieve information from a collector, access is also done using the respective keys. By just specifying the keys you get the respective child collector. To retrieve values from a collector you can call the following methods:
nullBoth of the above mentioned methods ignore any child collectors and only return the values of the addressed level.
Additionally a collector provides methods to iterate over its values
and child collectors. To iterate over a collector's values use
each
or
consume
with one argument:
c.identifiers.each { value ->
  ...
}
The difference between
each
and
consume
is that when using
consume
, the corresponding list of values is reset.
When using variable keys it may be desired to be able to iterate over
all keys (or child collectors) in a collector. For this the
eachCollector
method can be used. If only one argument is provided, the child
collector is passed in, if two arguments are provided the key and the
respective child collector are passed in:
c.eachCollector { key, child ->
  ...
}
If you are interested in the keys and corresponding child values of a
collector, you can use
each
or
consume
with two arguments to iterate over all present keys and the
respective value lists. For example:
c.each { key, values ->
  values.each { value ->
    ...
  }
}